women holding yoga pose on mountains above forest

Yoga for Hiking

By Yoga

Whether you’re going on an all day, strenuous hike or a short, flat easy hike, getting into some yoga asanas (poses) for a few minutes can be incredibly beneficial. Hiking presents a unique blend of challenges and rewards, pushing your body and mind through different terrains and elevations. As a hiker, embracing yoga asanas and some yogic concepts can enhance your experience, making each step steadier and each breath deeper.

Why Yoga on a Hike?

Before setting out, it’s important to prepare your body for the demands of hiking. Yoga can be a powerful tool for this, addressing key areas such as the chest, legs, hips, and back while also cultivating mental focus and respiratory efficiency. By checking in with yourself on the mat at home or right outside in nature before your hike, you can improve flexibility, strength, and mindfulness on the trail.

Yoga and Nature

Incorporating yoga into your hiking routine strengthens your body, calms your mind, and deepens your connection to the environment around you. Once you begin incorporating yoga into your life more and more, you’ll find that both hiking and yoga each enhances the other, leading to a richer, more fulfilling outdoor experience. Simply practicing a pose or two before you get on the trail can help prevent injuries and also help you release whatever you may have on your mind before you head full out into nature.

Some Reminders When Hiking & Doing Yoga

You know your body better than anyone else. Make sure you are aware of your limitations, injuries (past or present), and overall energy level before practicing yoga or heading out on a hike. Just like you are the only one who can decide what level yoga class you should attend, you are also the only one who can decide what level of difficulty you want to face on a hike. Remember, everyday is different and every body is different. What felt great last week may not feel great today.

If you are a regular practitioner of yoga, you are already in tune with your breath and aligned with how your body feels for you right now. Remember to keep this wisdom with you on any hike and during any physical activity you move through. Don’t forget to have fun and enjoy each moment because that’s really what’s at the heart of hiking, moving, breathing, and living!

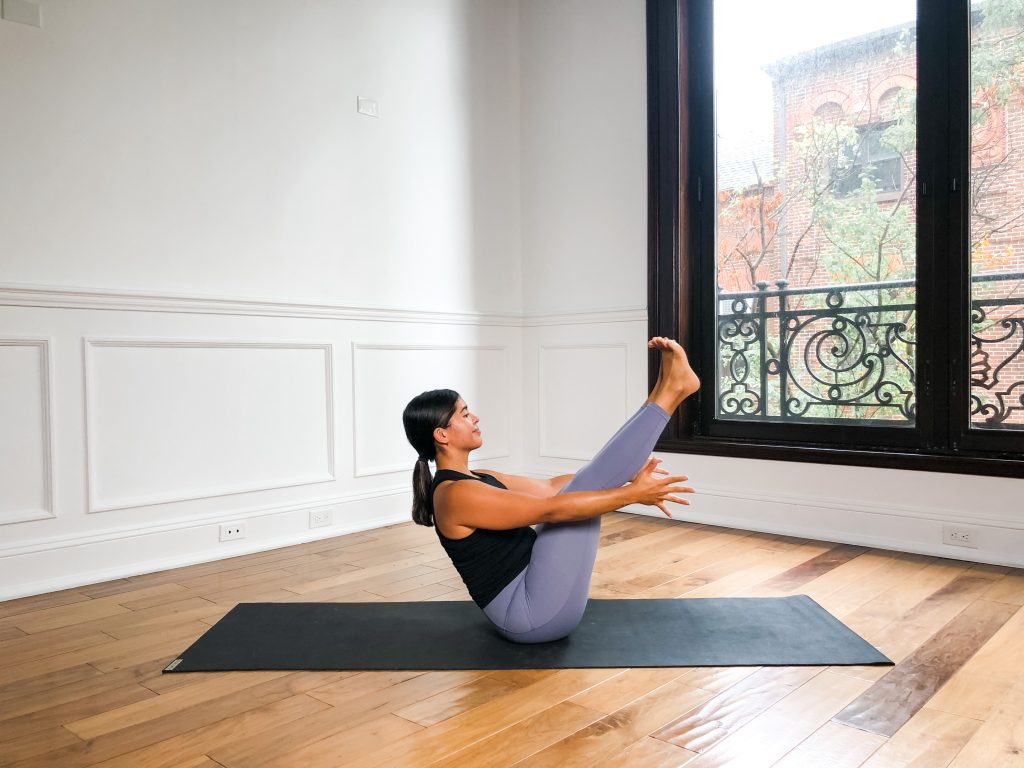
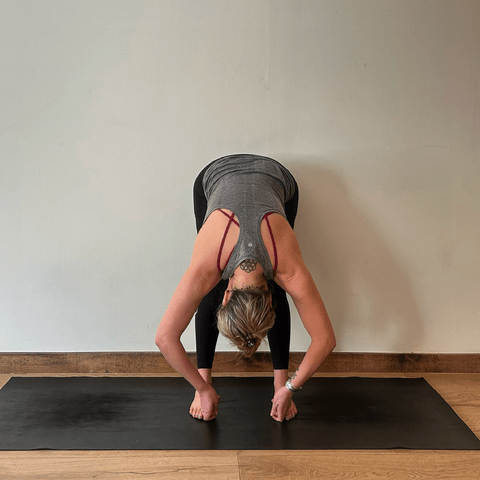
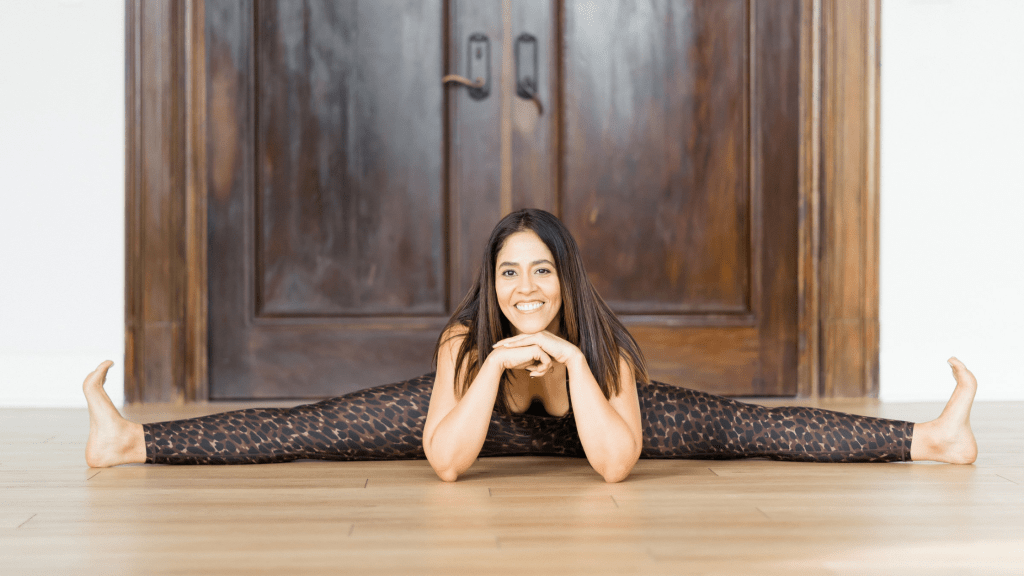
Prasarita Padottanasana (Wide-Leg Forward Fold)

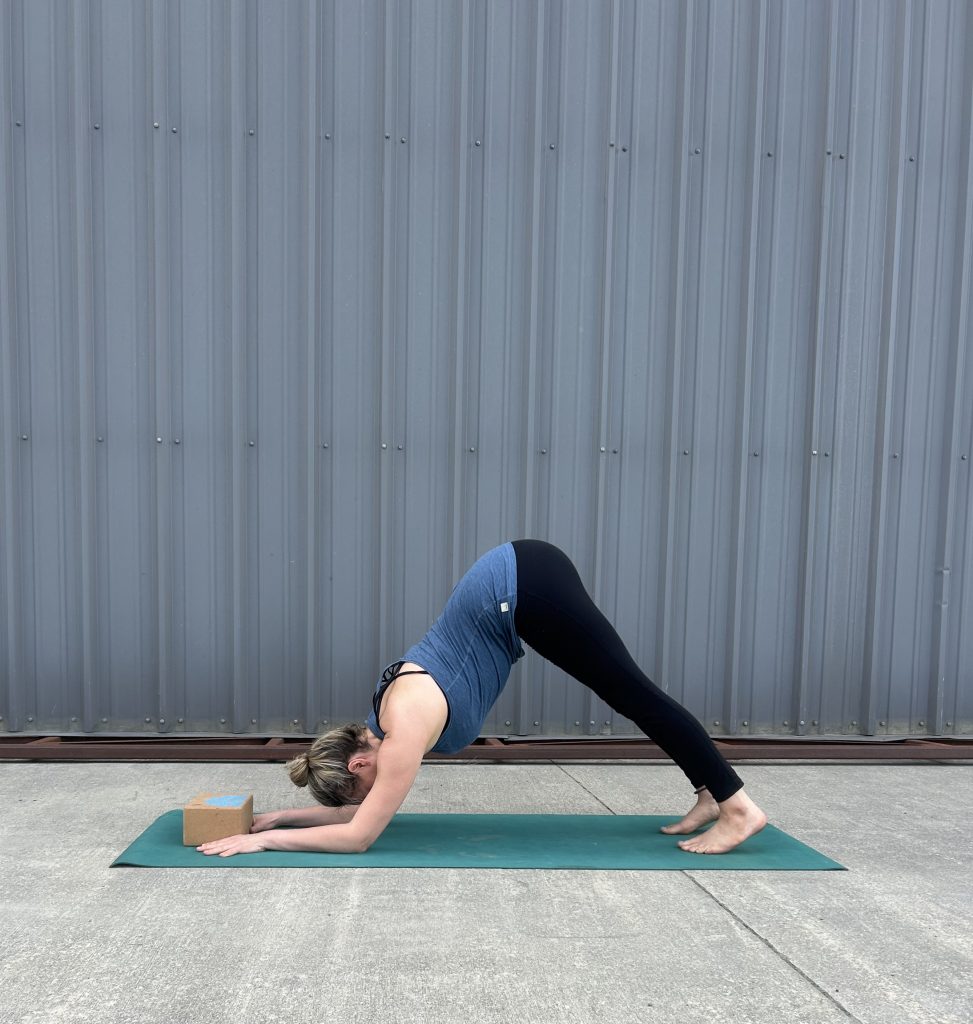
When you’re preparing for a hike, Prasarita Padottanasana, or Wide-Leg Forward Fold, can be a great addition to your pre hike prep. Regardless as to the length or difficulty level of your hike, stretching the legs is always helpful. Prasarita Padottanasana is performed with your feet wide apart and your hands down in the ground or up on something. This pose helps in stretching the hamstrings, calves, and the majority of the back body.

It’s especially beneficial as it helps open the hips and strengthens the legs without putting any pressure on the wrists, making it ideal if you’re recovering from a wrist injury or simply want to avoid aggravating any wrist pain. Approach this pose mindfully, ensuring you move slowly into the it to avoid any sudden movements that might strain your legs or back. This asana enhance overall body awareness, and also contributes to mental readiness for any challenges a hike might present.

How to get into Prasarita Padottanasana:

  1. Begin somewhere where you can step your feet wider than shoulder’s width apart. Ideally, when you stand tall and open your arms into a “T” shape, you try to being the edges of your feet beneath the tips of your fingers, but you can certainly take the legs closer together. You might put a backpack down in front of you or even use the back of your car or a tree trunk as you move into this asana.
  2. Bring your hands to your hips and start to fold forward between your legs. If you need to, you can bend your knees to control your descent down.
  3. Reach your hands down to the ground (or your backpack, car, or tree in front of you), and take a look at your toes. Try to have all toe tips facing the same direction or you can play with turning them slightly inward.
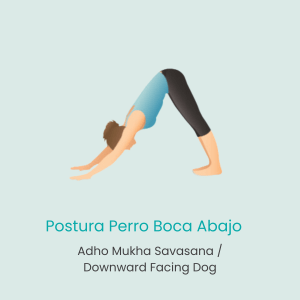
  4. Release the weight on your head to elongate your neck and either keep your hands where they are or walk them forward like a Downward Facing Dog with wide legs.
  5. As you breathe in, engage your thighs. As you breathe out, release your chest towards the earth.

*Reminders: Pay attention to the sensation you feel through the backs of your legs and your whole back body. Avoid going to deeply into this asana if you are feeling tight from a car ride or from anything that you did prior to preparing for your hike.

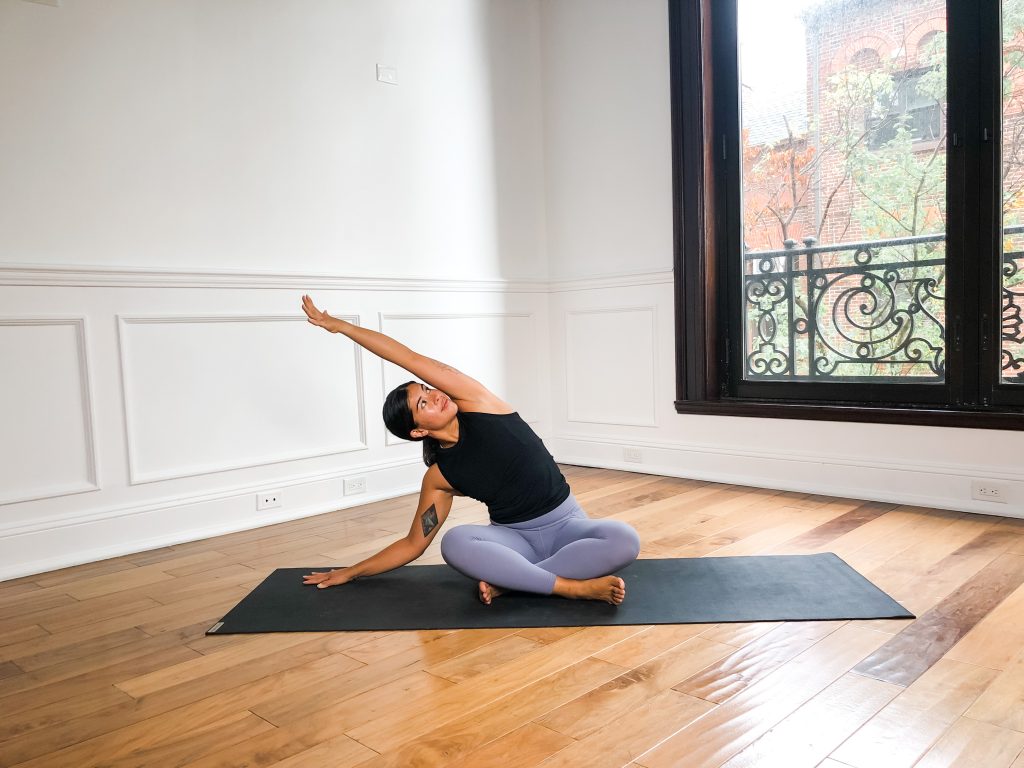
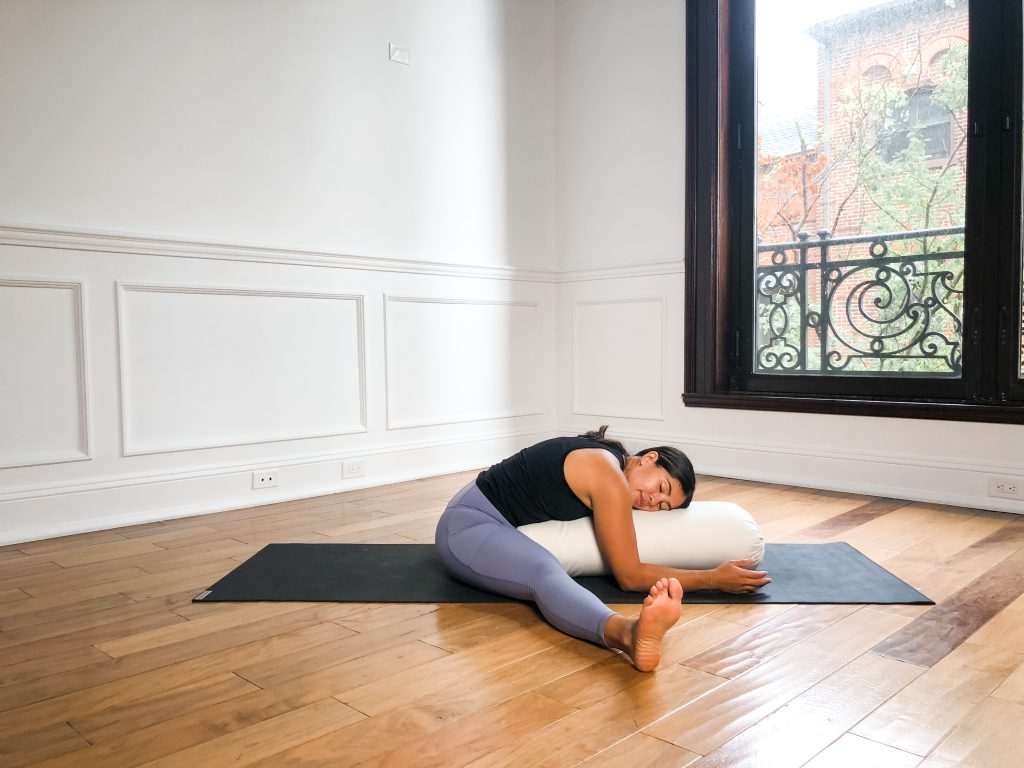
Skandasana (Wide Leg Squat Over One Leg)

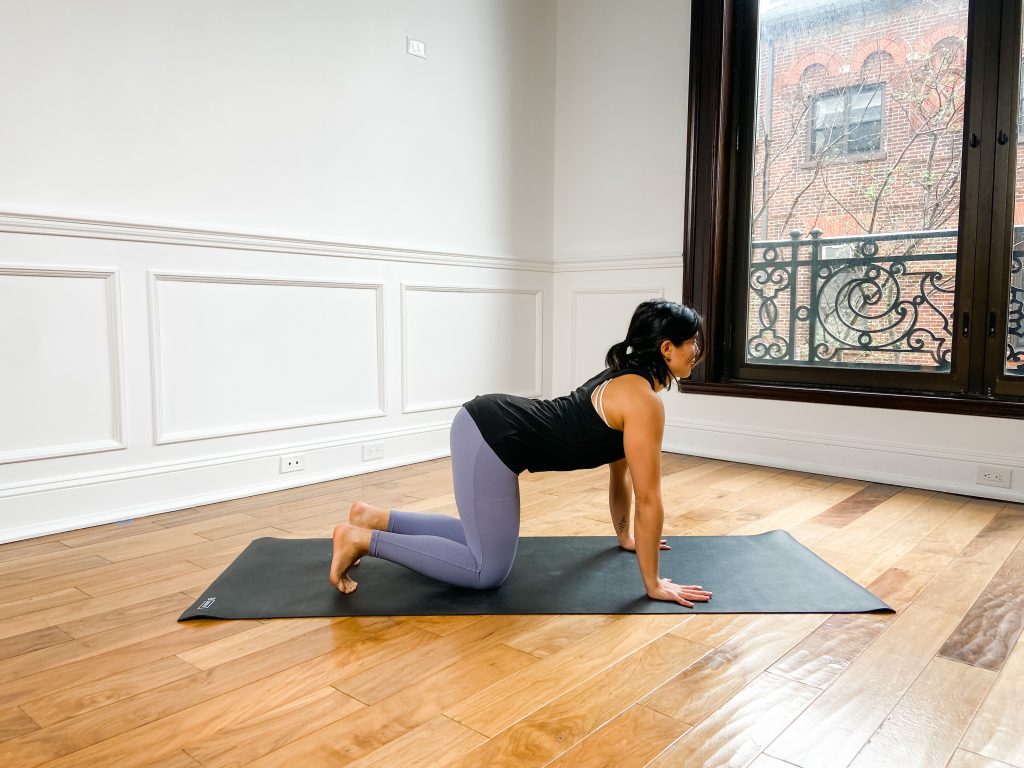
Your hips and knees are important for hiking, often bearing all of the activity’s demands. Skandasana is particularly beneficial in preparing these key joints and surrounding muscles for the trails. In Skandasana, you transition into a deep squat that targets one leg at a time, allowing the other leg to stretch out. This asana helps in opening up the hips, stretching the hamstrings and calves, and strengthening the quadriceps and glutes.
If you find yourself needing to take modifications don’t hesitate to adjust your stance or slow down to ensure proper alignment, which can significantly enhance the effectiveness of the pose while protecting your hips and knees. Remember, yoga is about fostering a nurturing relationship with your body, and when approached with care, Skandasana can be a powerful tool in preparing for a hike, enhancing your stability and endurance on the trails.

How to get into Skandasana:

  1. Begin in Prasarita Padottanasana and notice where your hands are. If you need to, grab your backpack or a water bottle, or brace yourself using the bumper of your car or a tree stump.
  2. Begin to bend one knee while keeping your hips facing the same side. Do your best to keep the heel of the bent knee rooted to the earth and the bent knee bending right over the second and third toes.
  3. Reach your sitting bones back in space and extend your chest forward.
  4. Release your hands to the ground or onto something. You may move your hands a bit more forward of your pelvis or towards one leg or the other.
  5. As you breathe in, flex the foot of the extended leg to make sure your toes turn towards the sky. As you breathe out, relax your jaw and shoulders.
  6. Repeat on the left side.

*Reminders: You are as unique as every plant and flower and leaf you see on your hikes! This means you should always listen to your body, notice your breathing, and work with your inhale and exhale to inform you of your limitations. Pay attention to what feels tight and what’s feeling open. Let that inform your pace of the hike.

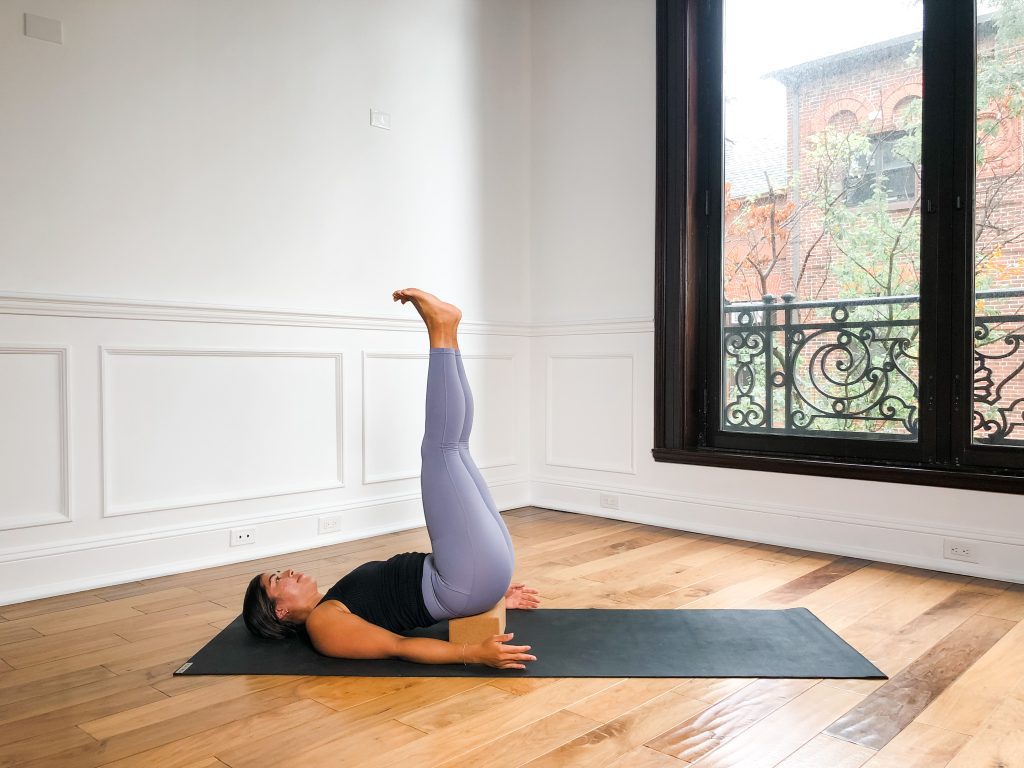
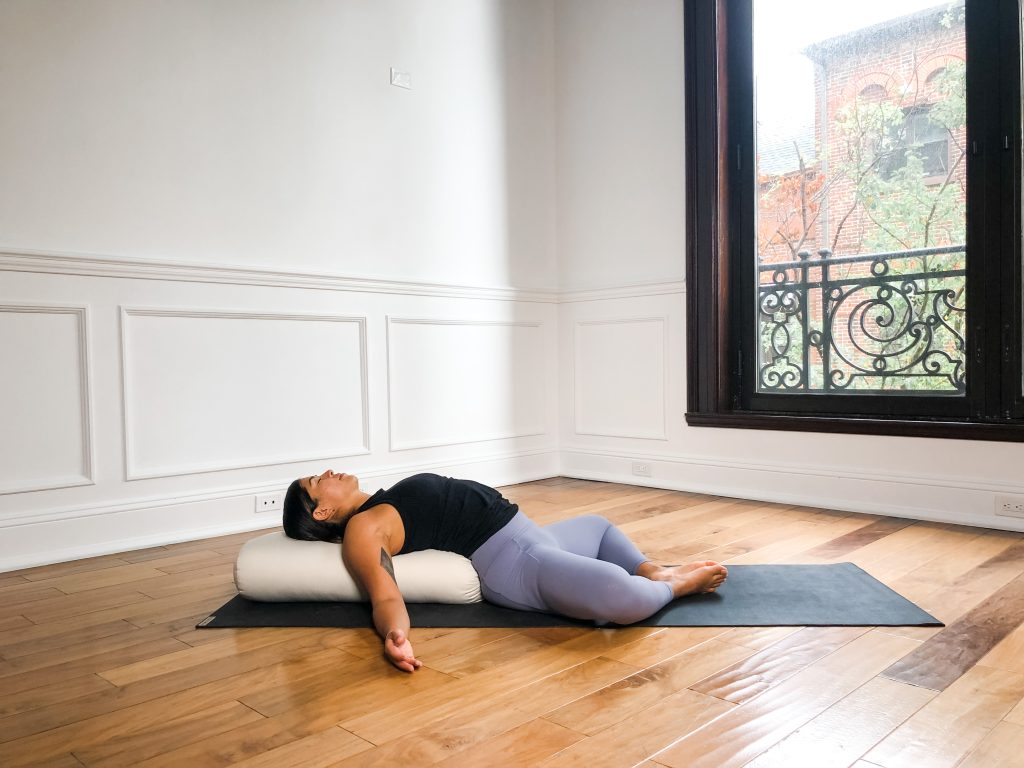
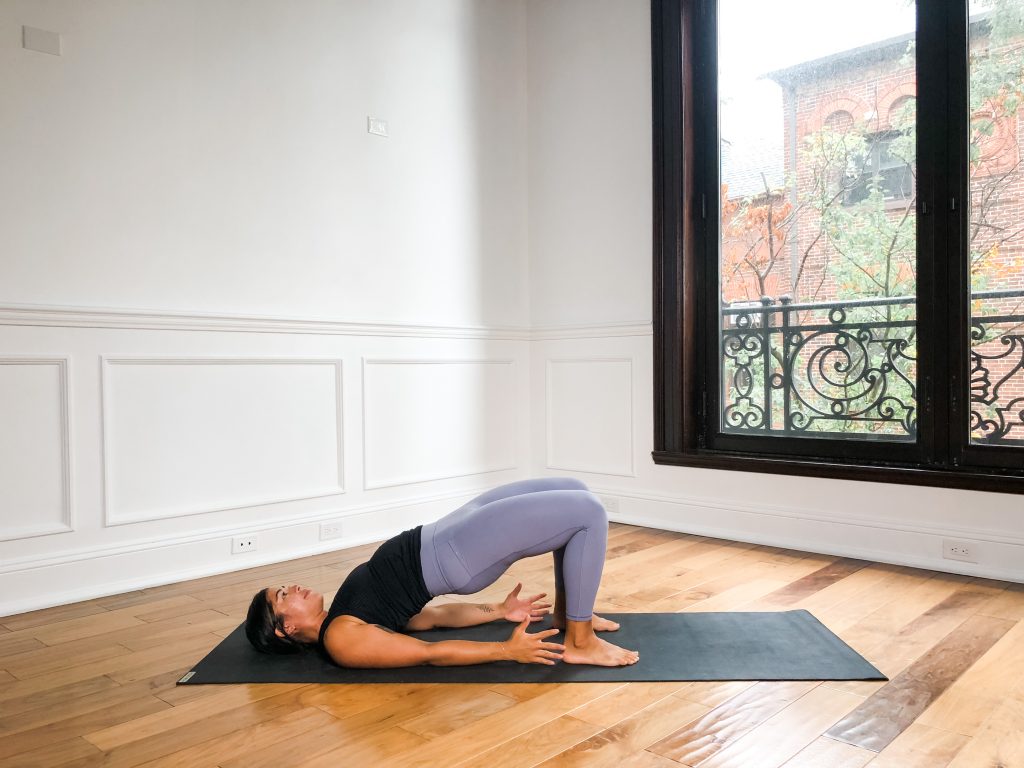
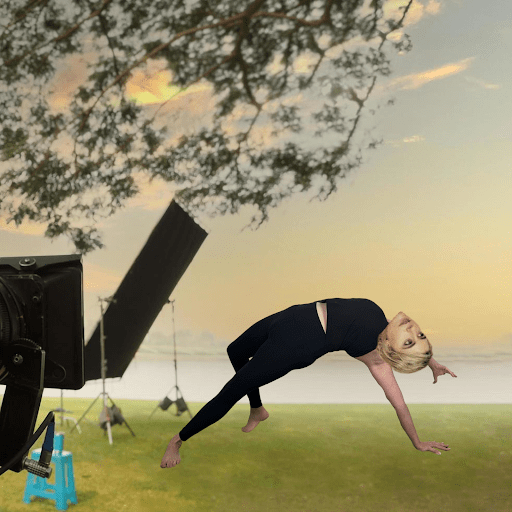
Purvottanasana (Upward Plank/Reverse Plank Pose)

Hips and shoulders are key players in maintaining balance and stability while hiking, and they can often be areas of tension due from wearing a backpack or uneven terrain. Purvottanasana, or the Upward Plank Pose (also known as Reverse Plank), is beneficial for strengthening these areas in preparation for hiking adventures. In Purvottanasana, you lift your body into a reverse plank position, which engages the muscles of the shoulders, back, core, and legs.

This pose not only strengthens but also stretches the front of the shoulders and the chest, providing a counterbalance to the forward-leaning posture often adopted during long hikes. Remember, yoga encourages a harmonious relationship with your body, and Purvottanasana can be a key part of preparing both physically and mentally for the demands of hiking.

How to get into Purvottanasana:

  1. You may want to find some grass, use a towel, blanket, or yoga mat for this one. Begin seated and step your feet to the ground in front of you and your hands to the ground behind you with your fingers facing your feet or facing outwards.
  2. Stretch your legs out in front of you and point your toes.
  3. Press into the earth with your hands and use the strength of your upper back to lift your chest towards the sky.
  4. Mindfully point your toes as you drive your hips to the sky.
  5. Continue to point your toes towards the earth and either look directly upwards to slightly back, being mindful of the sensation in your neck.
  6. As you breathe in, reach your hips skyward. As you breathe out, press the earth away from you.

*Reminders: You can always have your feet flat on the earth and your knees bent for this one so it resembles more of a reverse table top than a reverse plank pose. This can also be a helpful ally for your body post hike, too! Sometimes carrying a backpack or any other gear will cause the chest and shoulders to tighten up or even close off more than you’d like. This asana is a great way to open the chest after your hike or even while taking break!

Supported Shoulder Stand supported by a block on a yoga mat

Yoga for a Rainy Day

By Yoga Asana

Whether you enjoy rainy days, whether you’d prefer the sun, or whether you are neutral towards the rain… the energy of a gray, rainy day tends to be a little bit slower with a calling to go inward (or at least stay inside).

If we look to the guiding principle of ayurveda, “like increases like, opposites create balance,” rainy days are cold, wet, and have a lot of movement (think flowing water and sometimes gusting winds). Therefore, our practice should be one that keeps us warm, dry, and stable.

Since rainy days generally call for us to stay indoors, it’s the perfect time for us to invite in practices and poses which allow us to explore the inner landscape. You may notice the opposite on sunny days, which naturally bring people outside and often into more social environments.

Below are 5 poses which are perfect for a rainy day. You can practice them sequentially, or perhaps only do 1 or 2 depending on your capacity for the day.

Easy Seat with a Side Bend

Easy Seat with Side Stretch Pose

It’s easy to crumple into oneself on a rainy day. You might be hunching your shoulders or keeping your head down to do your best to stay somewhat dry. Starting with an easy seat and opening the side bodies might be just what you need to really look inward. We can’t travel in if we don’t have an opening to do so!

  1. Start with your right shin crossed in front of your left shin.
  2. Bring your right hand out to the side and sweep your left arm up and over your left ear as your laterally bend your spine.
  3. Repeat on the other side and then repeat all steps with the opposite shin in front.

Boat Pose

Woman in Boat Pose

Let’s invite some heat into the body to warm things up with boat pose. You don’t have to come into this variation immediately, or at all, if it feels too intense.

  1. Plant your sit bones into the ground, bend your knees, and bring your feet to the floor.
  2. Bring your hands to your thighs and press your thighs forward into your hands.
  3. Pull your hands into your thighs and pull your chest forward and up. *Option: Balance on the sit bones and lift the feet to face forward with shins parallel to the ground and then perhaps straighten your legs.
  4. Spread your toes.

Wide Leg Forward Fold

Wide Leg Forward Fold

There’s nothing like a good wide leg forward fold. It is a posture which allows the head to go down with the weight equally distributed through both legs. The wide stance creates for a strong and solid foundation.

  1. Widen your legs and feet, and organize your feet so they are parallel to the short sides of your mat.
  2. Lift your toes and kneecaps and press the thighs back as you fold your torso and head towards the floor.
  3. Bring your palms to the ground and spread the fingertips.
  4. Bend the elbows, pull your head to the floor (or another support if the head doesn’t touch the ground), and firm the upper back in.

Eagle

Eagle Pose

Eagle pose naturally brings one to and around their center. Since rainy days tend to have a lot of movement externally, incorporating balance postures can help to practice steady oneself. If balance feels really off, the toes of the wrapping leg can remain on the ground.

  1. Stand on the left leg and wrap the right knee around the left knee.
  2. Bend the knees.
  3. Wrap the right arm under the left arm with the elbows at about chest height with the fingers facing up.

Supported Shoulder Stand

Supported Shoulder Stand supported by a block on a yoga mat

On a rainy day, it feels like a lot is coming down. So lifting the legs up might be a good option to incorporate into your practice on these days. And especially with support under the pelvis, this option can feel particularly dreamy. Legs up the wall is another great option for a supported inversion.

  1. Lie on the ground and place a block under the sacrum.
  2. Lift your legs to the sky.
  3. Ensure your hips, knees, and ankles are stacked. It is OK to bend the knees so that there is an effortless feel with the legs up.
Yogi in purple yoga pants reclining over a linen bolster in Supta Baddha Konasana

Yoga for Finals

By Yoga Asana

For all you Yogis who are currently students, there’s generally one thing standing between you and your summer break…finals. Whether it’s final exams, projects, or papers, this time of the year can bring long hours in a library or coffee shop hitting the books, doing research, and/or writing until your fingers fall off.

It’s quite easy to get swept up in the work and feeling like there’s not enough hours in the day to prepare for everything. Before you know it, an entire day has gone by having only stared at a book or computer screen with the possibility that you haven’t taken much time away from your studies for yourself or for your body.

From my own perspective as someone who has gone through the rigors of higher education and who works in higher education, finals time can be quite tough on the body physically, mentally, and emotionally. While it could seem that not even a moment of the day can be taken for anything other than studying, I’m going to share some very brief yoga exercises and postures which take limited time and can help you drop into presence before embarking on everything else you have planned for the day. For those of you not in education, you can apply this to your work life…end of quarter time periods, closing out deals, and/or big projects coming to completion.

Reclined Bound Angle with Box Breathing

When spending time sitting at a desk all day, our posture generally sits in a contracted position with the chest and groin closed off. Reclined bound angle creates a shape where the chest, groin, and midline of the body can expand therefore making space for the lungs. It might be appropriate to set yourself up in a different way than what is pictured. You can have support beneath the knees, around the feet, or under the head. You might opt to have your back flat on the ground or different support under the back.

Box breathing is a balanced breath (the length of time for each increment is the same). You can begin with a count of 4 for each step of the breath practice below and progressively increase to longer lengths of time.

  • Inhale
  • Retention at the top
  • Exhale
  • Retention at the bottom*If you are new to breathwork, just focus on the inhale and the exhale for the same amount of time until you are able to comfortably do so.
Yogi in purple yoga pants reclining over a linen bolster in Supta Baddha Konasana

Reclined Bound Angle Pose on a bolster featuring Box Breathing

Warrior 2 into Triangle

Sometimes flowing from one pose into another helps to quiet the mind. Open hip postures keep the chest and groin open while expanding into the space around. Start in a standing position with the feet set up for warrior 2 and try following this breath pattern:

  • Inhale to extend the arms forward and back
  • Exhale to bend the front knee into Warrior 2
  • Inhale to straighten the front leg
  • Exhale to laterally bend into Triangle
  • Repeat 3-5x
Warrior II

Warrior II


Girl Doing Triangle with Arm Overhead Pose

Triangle Pose with a block outside the front foot

Easy Twist (variation on Revolved Side Angle)

There’s nothing like a good twist to free the spine and open the chest and upper back. You can take any variation of this posture that feels appropriate for you. You can opt for the back knee up or down. Perhaps it is appropriate to take the twist a bit deeper with the elbow hooked outside the knee. Challenge yourself to keep your breath deep and steady.

Revolved Extended Side Angle

Easy Twist (variation on Revolved Side Angle)

Bridge Pose

The hip flexors take a hard hit when you’re sitting in a chair all day. Bridge pose (and backbends in general) are the antithesis of a typical slouching sitting pattern, so it’s definitely not to be skipped! As with any of the other postures shared here, take the variation that serves you best on the day you are practicing. I like an active bridge to bring vitality into the body, but it may be more appropriate for you on some days to take a supported bridge. Either way, allow the front of the pelvis to widen and the corners of the chest to expand outward.

Bridge Pose

Bridge Pose

Happy Baby

To end, let’s take the feet up towards the sky and the legs wide, again putting yourself into a shape that is different from what you may be spending a vast majority of your time in for the rest of the day (i.e. sitting at a desk or computer). Try to relax your shoulders and head towards the floor. Relax the face in the process, and if you experience struggling to take hold of the feet, bring your hands to your shins or your thighs. Allow gravity to assist the settling into this posture. It might be appropriate to place blocks beneath each thigh for a grounding sensation.

Happy Baby

You can complete this entire sequence in 15-20 minutes, or you can take each shape when you need a small break from your studies. At some point, give yourself a savasana (5-10 minutes) perhaps with binaural beats or a short recorded sound bath!

Ayurveda book and mortar and pestle

Ayurveda Cheat Codes to Beat Allergies

By Ayurveda

Allergies are never fun! For some people they start as a small sniffle and then progress into the inability to breathe. For others, they can be completely debilitating, causing severe headaches and affecting the overall quality of life. The good news is that they can be avoided. The classical yoga and Ayurveda texts discuss ways to prevent and also manage these unfortunate seasonal troubles.

The Ayurvedic Perspective

According to Ayurveda, a 5,000 year old natural system of healing, as you transition through the seasons, your body undergoes subtle shifts, often leading to an imbalance in the doshas (the fundamental energies governing your body). Particularly, the shift from winter to spring can aggravate Kapha Dosha, leading to increased susceptibility to allergies. This can manifest as increased mucus and congestion, since Kapha Dosha is made of the elements of earth and water.

The Yogic Perspective

So many of the yoga asanas (poses) enhance circulation and promote detoxification, helping to clear toxins that might contribute to inflammation and allergic responses. Poses like twists and forward bends can help in the lymphatic drainage and purification of blood, which can improve overall immune function. Yoga helps in regulating the immune system, reducing its tendency to overreact to harmless substances like pollen or pet dander. A regular yoga practice can help balance immune response, which is super crucial for those suffering from allergies.

The Yoga and Ayurveda Connection

Yoga and Ayurveda are meant to be practiced together because they are closely interlinked systems within the broader scope of Vedic knowledge, each complementing the other to enhance well-being and balance in life. Ayurveda focuses on the health and balance of the body, mind, and spirit through diet, lifestyle, and natural therapies. Yoga, on the other hand, emphasizes physical postures, breathing techniques, and meditation to achieve mental and spiritual clarity and balance. When practiced together, you will be more balanced and at ease as you move through this beautiful life!

Yoga Asanas (Poses) For Allergies

Uttanasana – Standing Forward Fold

Uttanasana - forward fold

How to get into Uttanasana: Stand with your feet hips-width distance apart and fold forward over them, sending your chest towards your thighs. Hook your big toes with your peace fingers if it feels comfortable to do so.

Forward folds, like Uttanasana, can help in draining the sinuses due to the head-down position. This position allows gravity to help clear blocked nasal passages, which is beneficial for relieving sinus pressure and congestion associated with allergies. Forward folds also slightly compress the abdomen, which can stimulate the abdominal organs, including the digestive tract. Improved digestion helps in detoxifying the body and boosting immune function, both of which are crucial in managing allergies. Lastly, forward folding will help encourage a longer exhale, which is key to allergy prevention and management.

How to:

  • Begin standing at the top of your mat – or anywhere you’d like! This pose can be done anywhere.
  • Separate your feet about hips-width apart and bend your knees. Release your head and upper body over your legs.
  • If possible, wrap your first two fingers and thumbs around your big toes and bend your elbows out to the sides.
  • If reaching for the toes isn’t available to you, you can keep your knees bent or bend them deeper to reach the ground. You may also put a yoga block or any prop of your choice beneath your hands. A stack of books or a water bottle work great here!
  • Elongate all sides of your neck and imagine the tips of your ears getting heavier to release any tension in the neck.
  • Try to scoop the low abdominals in and up to create more space for your chest to release towards your legs and distribute the weight throughout the feet.
  • You may need to put a bit of weight towards the fronts of the feet to allow your hips to move over your heels.
  • As you inhale, engage your thighs if you’re lengthening your legs. As you exhale, spread through your collarbones.

Ardha Matsyendrasana – Half Seated Spinal Twist

Half Lord of the Fishes Pose - Half seated spinal twist

How to get into Half Lord of the Fishes: Start with your legs out in front of you, then cross one foot over the bottom leg as you bend that knee, keeping your sits bones rooted firmly on the ground. Hook your opposite elbow around the lifted knee to turn from your center and gaze over your back shoulder (the arm that is planted on the floor behind you).

Twisting asanas (poses) are great for supporting digestion, detoxification, and respiratory health. They stimulate the digestive organs by compressing and massaging the abdominal organs, including the stomach, liver, and intestines. This stimulation helps improve digestion and the elimination of toxins (Ama). Twists can also benefit the respiratory system because the action of twisting and then releasing can help increase the movement of the diaphragm and rib cage, which in turn enhances lung capacity and facilitates deeper breathing. According to Ayurveda, twists help in balancing energy channels (nadis) and centers (chakras) in the body. Balancing these energies can strengthen the body’s natural defenses and reduce the susceptibility to allergies.
Lastly, the action of twisting and then releasing can help facilitate lymphatic drainage. The lymphatic system plays a crucial role in immune function by removing waste and carrying white blood cells throughout the body. Improved lymphatic flow helps ensure that the immune system is functioning well.

How to:

  • Begin sitting with your legs stretched out long in front of you.
  • Bend your right knee and hug it into your chest. Make sure both sitting bones are rooting down into the mat.
  • Step your right foot outside of your left thigh and keep hugging your leg in towards your chest.
  • As you inhale, lengthen your spine. As you exhale, turn to the right and bring your right hand outside of your right hip or further behind you.
  • You can hug your right leg in with your left arm or use it to help you twist a bit deeper.
  • If it’s available to you, you may also bend your left leg in, but if it causes your sitting bones to lift or your hips to shift, re-extend your leg back out.
  • With every inhale, lengthen your spine and with every exhale turn your navel to the right.
  • Stay for a few cycles of breathing and then repeat on the left side.

Ayurvedic Digestive Tea for Allergies

Ayurvedic allergy tea made from cumin, coriander, and fennel seeds

Ayurvedic allergy tea made from cumin, coriander, and fennel seeds

According to Ayurveda, allergies often occur when the immune system overreacts to a foreign substance that doesn’t bother most other people. These substances are called allergens and can include pollen, pet dander, and dust mites. Allergies can be managed by balancing the doshas (the fundamental bioelements in Ayurvedic medicine) and strengthening the body’s natural defenses. Ayurveda often addresses allergies by reducing Kapha and supporting the digestive fire, or Agni, to reduce the production of Ama (toxins). For managing allergies with tea, a “Digestive (CCF) Tea” made from cumin, coriander, and fennel seeds is recommended. This tea aids digestion, which is so important in preventing the accumulation of Ama.

Here are some of the key benefits of CCF tea according to Ayurvedic principles:

  • Digestive Support: CCF tea is renowned for its ability to aid in digestion. The combination of cumin, coriander, and fennel helps in the assimilation and absorption of nutrients and eases digestive discomforts like gas, bloating, and indigestion.
  • Detoxification: This tea is considered a gentle yet effective detoxifier. It assists in flushing toxins out of the body, particularly from the urinary tract, liver, and kidneys.
  • Balancing Doshas: CCF tea is known for its ability to balance the three doshas (Vata, Pitta, Kapha) in Ayurveda, which is essential for maintaining health and well-being.
  • Boosts Metabolism: The ingredients in CCF tea are believed to stimulate the metabolism, making it an excellent drink for those looking to maintain a healthy weight.
  • Reduces Inflammation: With its anti-inflammatory properties, CCF tea can help reduce inflammation in the body, which is often the root cause of many health issues.
  • Improves Skin Health: The detoxifying and anti-inflammatory properties of this tea can also contribute to clearer, healthier skin.
  • Enhances Immune Function: The combination of these three spices is known to strengthen the immune system, making the body more resilient against infections and diseases.
  • Calming Effect: CCF tea has a calming effect on the mind and body, helping to reduce stress and promote relaxation.
  • Regulates Blood Sugar: Especially beneficial for those with diabetes or metabolic issues, CCF tea can help regulate blood sugar levels

Ingredients:
1tsp cumin
1tsp coriander
1tsp fennel
4 cups of water

Instructions:
Boil water, add spices, turn heat to simmer, cover and steep for about 10 minutes or until spices sink to the bottom. Strain and drink throughout your day. Store your tea in a thermos, as this is meant to be consumed warm.

You can also purchase the tea pre-made from a brand I love, Banyan Botanicals.

Take Care of Yourself

Make sure you move your body, spend time with people you love, and take care of your overall digestion and keep a balanced diet during this allergy season, and throughout all seasons! Please also always check with your healthcare provider before trying a new physical activity or taking any new spices or teas.

A note from Lisa: My mission is to guide individuals on their journey to balance and holistic well-being using the age-old wisdom of yoga and Ayurveda. I provide insights into dietary choices, lifestyle habits, and general well-being practices tailored to your unique constitution. It is essential to note that my services are strictly for educational and supportive purposes. I do not diagnose, treat, or cure diseases or medical conditions. If you have specific medical queries, always consult with a licensed healthcare provider. I am eager to assist you on your wellness journey and warmly invite volunteers who wish to experience and participate in case studies exploring Ayurvedic practices. Together, let’s embark on a path to holistic health.

Lisa Bermudez (yoga and Ayurveda teacher) headshot


— Written by Ayurveda teacher Lisa Bermudez

Seated Wide Legged Fwd Fold

Yoga for Grief (Mother’s Day Edition)

By Yoga Asana

Many people are looking forward to celebrating their lovely mother this coming Sunday. I, on the other hand, am viciously unsubscribing from every Mother’s Day promo email I could find (after the reminder from my younger brother). Mother’s Day can be such a celebratory, loving time for many yet the most tender, painful reminder for others. Whether your mom is estranged, no longer on this physical plane, or a random, unknown figure, this post will help you find comfort during this period – in whatever way you’re celebrating.

For a long while, I thought grieving would make me hard, calloused, angry at the world – and for a moment in time, it did. It was through this great, agonizing pain that I found a way to sort of “sit with it,” leaning into the discomforts of how angry I felt that my mom had been taken from me. This anger was the catalyst that would eventually lead to (I can’t believe I’m using this word) liberation. Slowly, over time, I began to notice my mom and her love everywhere. Emanating, glowing, reverberating in everything I would do.

I took to my yoga practice, while also exploring breathwork with the fabulous Katie Healy at our studio in Hoboken, NJ. I started to attend classes I knew would help me drop into the trauma I was holding in my physical body. And it was through these practices (along with intensive talk therapy) that I began to find comfort in the loss of my mother. I learned that even though she can’t be here physically, that by connecting with my loved ones who are still here that she could be found in every corner. From this realization, I was able to compile a safe, comforting yoga practice that really helped me in times I felt vulnerable and sad over missing her. Now when I practice, it’s almost as if it’s in her honor, as I KNOW she’d be thrilled I found something to bring me immense joy and relief. If you’re feeling emotional as this holiday approaches, here’s a simple practice you can do when the feelies are extra tender…

Balasana (Child’s Pose)

Child’s pose is essential. It works in between gym workouts and is the perfect starting point for any yoga class. Child’s pose elongates the spine and allows for a full body stretch. It’s also a very calming pose, making contact with the ground, spreading through the palms and sitting back on the heels. Energetically, child’s pose helps us ground and find stability in the body while coming in sync with the breath.

The variations of child’s pose include:

  • Bolster underneath the chest with arms on either side
  • Walking the fingertips over the right and left to get a side body stretch
  • Placing a blanket underneath your seat to add more support
Child's Pose on a yoga mat

Balasana (Child’s Pose)

Bitilasana/Marjaryasana (Cat/Cow)

Cat/cow is also an essential pose for a yoga class and acts as a stretch for the spine. Cow pose is done by dropping the belly and lifting the chest – this is typically done on an inhale with the toes tucked under (pictured below). On the exhale, the shoulders round while pressing through the palms to broaden the collar bone, allowing the tops of the feet to lay firmly on the mat (a child’s pose foot).

Cat pose

Bitilasana Cat Pose)


Cow pose

Marjaryasana (Cow Pose)

Halasana (Plow Pose)

Plow pose (Halasana) allows us to get comfortable with our heart elevating towards the motion of going up over our head. Halasana is typically the prep pose for shoulderstand (Sarvangasana) and has very relaxing qualities. To get into Halasana, start by folding 3 blankets towards the back half of your mat, set your shoulders on the blankets, ensuring your head and neck are NOT on the blankets. Then, once comfortable, roll your feet up over your head to find the ground behind you. If you need to roll out and reset a couple of times, that is totally OK.

Benefits of Halasana:

  • Quiets the mind
  • Calms the nervous system
  • Stretches the legs
  • Strengthens the neck
  • Creates stability in the shoulders
Person in purple leggings in plow pose

Halasana (Plow Pose)

Salamba Sarvangasana (Supported Shoulderstand)

If you’re loving Halasana, try getting up into full Salamba Sarvangasana. This pose is extremely relaxing for the mind. While it may take a couple times to get into the full expression, once you’re there, time can feel like it’s flying by. You’ll come to this relaxed state of existing where your body seems to “float” above you. Sarvangasana is considered the queen of yoga poses. With its stable nature and ability to align the body with the heart over the head, it truly embodies the essence of a queen.

To get into shoulderstand:

  • Start in plow pose
  • Slowly (with control) play with lifting one leg straight up into the air, then the other
  • Once your legs are extended up towards the ceiling, climb your hands up your back to support you
  • Once steady, press through the balls of your feet
  • Send your tailbone & pelvis forward
Shoulderstand - Halasana

Sarvangasana (Shoulderstand)

Upavistha Konasana (Seated Wide Legged Forward Fold) *with Bolster

This pose speaks for itself just by the way it looks… With a bolster underneath your body, folding forward onto the bolster with wide legs is the most luxurious yoga pose you can do. Allow your head to rest upon the bolster and find a comfortable distance for your legs to spread out to (making a V shape around either side of the bolster). Seated forward folds are a great way to encapsulate and ruminate on all the work you’ve done throughout class. It allows for us to come back to the breath and slow down.

Seated Wide Legged Fwd Fold

Upavistha Konasana (Seated Wide Legged Forward Fold)

I hope you enjoyed these vitalizing and rejuvenating yoga poses – they’ve helped me during both tough times and celebratory times. Maybe you can even try them with your mom or mother figure in your life!

A photoshopped photo of Victoria Beckham in Goddess Pose in front of a Spice World sign

Embracing the “Mother” Energy: 5 Yoga Poses for Empowerment and Iconic Femininity

By Yoga Asana

In the ever-evolving landscape of internet culture, slang terms come and go, leaving their mark on the lexicon of each generation. Among the diverse array of phrases and references, one that has recently gained traction is “She is mother.” This seemingly straightforward term carries layers of meaning, often used to denote an iconic feminine figure or an act that contributes to such status. While it’s frequently applied to celebrities like pop stars and actresses, its resonance extends beyond the realms of fame, touching upon themes of empowerment, strength, and femininity.

At its core, “She is mother” embodies a celebration of powerful femininity—an acknowledgment of the strength, resilience, and influence embodied by certain women in society. It’s a recognition of their ability to inspire and uplift others, leaving an indelible mark on culture and consciousness. In the world of yoga, this sentiment finds resonance in the practice of asanas that embody strength, grace, and empowerment.

Let’s delve into five powerful feminine yoga poses that not only cultivate physical strength but also evoke the spirit of iconic female figures:

Goddess Pose (Utkata Konasana):

This wide-legged squat exudes strength and stability, reminiscent of the goddesses of mythology who command respect and admiration. Goddess Pose mirrors the refined sophistication and unwavering confidence of Victoria Beckham—a fashion icon, businesswoman, and cultural influencer known for her impeccable style and poised demeanor. Like the goddess she represents, Beckham exudes a sense of grace and authority, commanding attention wherever she goes.

A photoshopped photo of Victoria Beckham in Goddess Pose in front of a Spice World sign

Revolved Warrior Pose (Parivrtta Virabhadrasana):

As the body twists and reaches towards the sky in this dynamic posture, one taps into their inner warrior spirit. Much like Swift’s journey of self-discovery and empowerment, Revolved Warrior Pose invites practitioners to embrace the process of transformation and renewal. With each twist of the torso, they release stagnant energy and open themselves up to new possibilities, embodying the spirit of resilience and growth.

A photoshopped photo of Taylor Swift in Revolved Warrior (also known as Peaceful Warrior)

Wild Thing Pose (Camatkarasana):

This heart-opening pose exudes a sense of freedom and fearlessness, much like the spirit of a wild thing roaming untamed. Wild Thing Pose mirrors the creative brilliance and uninhibited spirit of Greta Gerwig—a filmmaker known for her bold storytelling and distinctive voice in cinema. Like the “wild thing” she embodies, Gerwig fearlessly explores the depths of human experience, infusing her work with authenticity, humor, and heart.

A photoshopped image of Greta Gerwig outside doing wild thing yoga pose in front of camera equipment

Warrior II Pose (Virabhadrasana II):

As practitioners extend their arms outward and sink into a strong lunge, they embody the fierce determination and unwavering strength of Warrior II Pose. This pose resonates deeply with the commanding presence of Angela Bassett—a trailblazing actress known for her powerful performances and unapologetic presence on and off the screen. Like the warrior she portrays, Bassett exudes confidence, strength, and an unyielding commitment to her craft.

A photoshopped image of Angela Bassett in Warrior II pose on the red carpet at The Oscars

Tree Pose (Vrksasana):

In the context of powerful feminine energy, Tree Pose serves as a reminder of the deep connection between women and the natural world. Like the sturdy trunk of a tree supporting its branches and leaves, Lily Gladstone draws strength from her roots—whether it be familial bonds, cultural heritage, or personal values—that anchor them in times of challenge and change.

Lily Gladstone photoshopped on a yogi in the woods doing Vrksasana pose (also known as Tree Pose)

By incorporating these yoga poses into your practice, you can tap into your innate strength and cultivate a sense of empowerment that extends beyond the mat. Whether you’re balancing the demands of parenthood, pursuing your passions, or simply embracing your authentic selves, the “mother” energy serves as a reminder of your inherent power and resilience.

In essence, “She is mother” transcends mere slang—it’s a testament to the enduring influence of feminine energy in all its forms. As women come together to support and uplift one another, they embody the essence of iconic figures who have paved the way for generations to come.

So, let’s roll out our mats, strike a pose, and embody the spirit of “I am mother”—a celebration of the divine feminine within us all!!!

Isa Brand headshot

— Written by our in-house Gen Z Correspondent, Isa Brand

Warrior 2 (Guerrero 2) clipart

Weekly Class Theme: Cinco de Mayo

By Yoga Asana, Yoga Teachers

This week, we’re celebrating Cinco de Mayo by hosting a bilingual yoga class. Today, we will explore poses in their Spanish name and then translate it to the English and root in Sanskrit. This is an easy beginners guide toward teaching a few poses in Spanish to help your yoga students learn the pronunciation.

We published another article with tips on how to teach a bilingual yoga class, so this will be a layout of an actual class to act as an example of that. Be sure to subscribe to our weekly newsletter for more yoga class outlines, themes, and helpful, downloadable information to help construct fun and effective yoga classes for all!

Let’s get to it…

Postura De MontaĂąa (Mountain Pose)

Postura De MontaĂąa (Mountain Pose)

This is one of the most common poses in a yoga class. Mountain pose may look relatively easy but there is a lot going on. In tadasana, you must ground down through all four corners of each foot, spread through the collar bones to lift the chest and focus your drishti straight ahead.

Guerrero 1 (Warrior 1)

Guerrero 1 (Warrior 1)

Warrior 1 is a powerful pose that helps to energize through chest while pulling your arms up overhead to strengthen the shoulders. The front knee stays bent and back foot should aim to be planted on the mat.

Guerrero 2 (Warrior 2)

Guerrero 2 (Warrior 2)

Warrior 2 is arguably the most-used standing yoga pose (at least in a vinyasa style yoga class) as it exemplifies strength, power and vigor in a yoga practice.

Guerrero 3 (Warrior 3)

Guerrero 3 (Warrior 3)

Warrior 3 helps us to find balance and steadiness. Warrior 3 is a great pose to use in a balance and twist section of class to get students realigned with their body and breath.

Postura Perro Boca Abajo (Downward Facing Dog)

Postura Perro Boca Abajo (Downward Facing Dog)

Downward dog is the pose that prepares students to get moving. The back of the legs open and students become comfortable with elongated the spine while pressing through their hands and feet.

Ángulo Lateral Extendido (Extended Side Angle)

Ángulo Lateral Extendido (Extended Side Angle)

At YogaRenew, we suggest that every class include triangle pose and extended side angle because they are open hip, standing poses that properly warm up the body for every other pose throughout class.

TriĂĄngulo Extendido (Triangle Pose)

TriĂĄngulo Extendido (Triangle Pose)

Same goes for triangle pose – this open hip, standing pose is great for activating all of the core elements used throughout the rest of class.

Postura De Media Luna (Half Moon Pose)

Postura De Media Luna (Half Moon Pose)

Half moon pose is both an open hip pose and a balancing pose. Although you may use a block or reach your hand to the ground, it gets students comfortable with being on one foot.

Postura Del NiĂąo (Child's Pose)

Postura Del NiĂąo (Child’s Pose)

A place to re-center, re-focus on the breath and allow for active resting.

Liz - Bilingual Yoga Class Instructor

Teaching Bilingual Yoga Classes

By Yoga Teachers

9 Tips for Teaching Bilingual Yoga Classes

Bilingual yoga classes provide a unique opportunity for community building, bringing together individuals with a shared interest in yoga and language learning. These classes create a supportive and inclusive space where participants can connect with others, share their experiences, and learn from one another. The sense of community fostered in bilingual yoga classes can extend beyond the studio, as participants build lasting relationships based on their shared love for yoga and language learning. This sense of belonging can enhance the overall yoga experience, creating a supportive community that extends far beyond the mat.

1. Focus on your students

Being focused on students will make them feel comfortable and included. The first thing you must do is ask how many people speak Spanish or English in the class. This is how you’ll determine the number of Spanish or English speakers in the class so you can choose which language should take precedence. Knowing how many students speak one language or another will help you identify who may need more assistance during class.

Bilingual yoga classes offer a rich cultural experience by integrating language learning with yoga practice. Participants not only engage in physical movement but also immerse themselves in the language and cultural nuances associated with it. This cultural immersion can deepen their understanding and appreciation of the language, as well as the cultural context in which it is spoken. By incorporating elements of the language into yoga practice, such as using native terms for yoga poses or incorporating cultural references, participants can develop a more profound connection to both the language and the practice of yoga.

2. Give your dharma talk in both languages

Start the class with a dharma talk in both languages, switching to both languages. This will help students feel connected to the dharma talk in their native language while also helping them to learn and absorb another language. By giving the dharma talk in both languages, you are including the entire class and creating a welcoming environment that may feel more accessible for certain students who weren’t able to find a class in their language to begin with.

3. Speak slowly

Keep in mind that students in addition to enjoying the benefits of yoga may want to learn or improve their second language. So we must speak slowly and clearly. Bilingual yoga classes require participants to listen and respond to instructions in two languages, which can enhance cognitive skills such as focus and attention. Practicing yoga in a bilingual setting challenges the brain to process information in multiple languages simultaneously, improving cognitive flexibility and mental agility. This can have a positive impact on other areas of life, such as work or study, where focus and concentration are essential. By engaging both the mind and body, bilingual yoga classes offer a holistic approach to improving overall cognitive function.

4. Say the poses in both languages

During class it is important that you mention the poses in both languages ​​and include Sanskrit in those common poses and/or poses that are most repeated during class. The combination of language learning and yoga practice in bilingual classes creates a unique learning environment that enhances overall language acquisition. Studies have shown that integrating language learning with physical activity, such as yoga, can improve memory retention and recall. This is because physical activity stimulates the brain and enhances its ability to absorb new information. Additionally, practicing yoga in a bilingual setting provides practical, real-world language experience, allowing participants to apply their language skills in a meaningful context. This hands-on approach can accelerate language learning and improve fluency.

The mind-body connection is central to the practice of yoga, and practicing yoga in a bilingual setting can enhance this connection. By processing instructions in a different language, participants engage different parts of the brain, creating new neural pathways and strengthening the mind-body connection. This heightened awareness can lead to a deeper, more meaningful yoga practice, as participants become more attuned to their bodies and the present moment. Additionally, the mindfulness cultivated through yoga practice can carry over into language learning, enhancing overall mental clarity and focus.

5. Offer additional assistance if you see someone confused

Cues for the poses might be used in the language that predominates in the class but pay attention to students who speak the second language in case they need assistance. By knowing both languages yourself, you’ll be able to specifically guide and adjust students by noticing their body language. Approaching a student that may be a bit confused is a great way to make the class feel personalized and accessible.

6. Use simple cues & go slow

Use simple cues and accessible transitions to sequencing the class. Just like a typical yoga class, you don’t need to verbally say each alignment point – find the most important ones that are easy for students to understand (starting with the hands and the feet). Students came to class to move; by not over complicating our cueing, we can create a space that allows students to explore their own bodies themselves.

Secondly – go easy. Create a slow and juicy class to keep students interested and committed to coming back.

7. Create a playlist that won’t distract students

Choose instrumental music preferably or perhaps include one or two songs in the second language. Choose songs that perhaps might be identified by the students so they feel like there was intention behind the class composition. Again, they may not be used to attending classes where their native music or music genre is being played, so this is a great way to include them and give them a sense of familiarity.

8. Close the class in both languages

Close the class using both languages ​​and remember to maintain the yoga jargon or include a mantra if you like – just how you started the class giving a dharma talk in both languages, make sure you end the class the same way so the class feel cohesive and what you talked about really resonates. Students may rarely remember what you said specifically, but they will remember that you were attentive to guiding them in both languages.

9. Take bilingual classes yourself

Bilingual yoga classes create a welcoming and inclusive environment for individuals from diverse linguistic backgrounds. By offering classes in multiple languages, yoga studios can cater to a wider audience and provide a space where everyone feels welcome and by practicing in bilingual classes yourself, the inclusivity extends beyond language proficiency levels to encompass cultural differences as well. Participants are encouraged to embrace their unique cultural backgrounds while also learning from others, fostering a sense of unity and understanding among all participants. You can practice bilingual classes online or in person. Florida is one of those destination where bilingual classes have became popular in all main yoga studios.

Bilingual yoga classes offer a range of benefits that cater to both the body and mind. Whether you’re looking to deepen your yoga practice, improve your language skills, or simply connect with others, bilingual yoga classes provide a unique and enriching experience that can enhance your overall well-being.

A woman's hands on a laptop - Going Digital as a Yoga Teacher

Going Digital as a Yoga Teacher

By Yoga Online, Yoga Teachers

In today’s digital age, embracing the shift to online platforms is as essential for yoga teachers as it is in many other fields. Going digital gives yoga teachers the chance to reach a wider audience, connect with more like-minded people, and to share the teachings of yoga with people who otherwise wouldn’t get the opportunity to learn about all things yoga. The transition from being purply in-person and face-to-face to a more digital platform requires the same mindfulness and intentionality you apply in your physical yoga practices, allowing you to extend the reach of your teachings beyond the traditional studio environment.

Understanding the Digital Landscape: More Than Just Social Media

Creating a compelling digital presence involves more than just being active on social media. It’s about building a comprehensive digital identity, which includes a user-friendly website, a blog that offers deeper insights into your yoga practice, and potentially offering online classes. Each element should be thoughtfully crafted to reflect your unique voice and approach, much like how each asana in a yoga sequence is intentional.

Social Media: Crafting Your Online Community

Social media platforms are not just for posting content; they are mediums for building and nurturing a community. Channels like Instagram, Facebook, and YouTube are ideal for sharing your yoga journey, engaging with your audience, and creating a community that resonates with your practice. This approach fosters interaction, reminiscent of the community feel in a physical yoga class.

Content Creation: Expressing Your Yoga Philosophy Online

Your digital content is the heart of your online presence. It should authentically reflect your expertise, passion, and the essence of your yoga philosophy. Whether through blog posts, instructional videos, or social media updates, your content should be informative, engaging, and true to your yoga teachings.

SEO and Keywords: Essential Tools for Digital Visibility

Understanding SEO (search engine optimization) and effectively using keywords are critical for enhancing your digital visibility. Choosing appropriate keywords helps guide the right audience to your content. Implementing SEO strategies can significantly improve the accessibility and visibility of your online presence. Find out what words are being searched around the offerings you currently have and try to use them as much as possible in everything you share online. This will help you get found on the internet and also bring in the students and clients who are right for you.

Balancing Online and Offline: A Harmonious Approach

While building an online presence is crucial, it’s important to maintain the in-person element that’s inherent in yoga. Your digital offerings can complement, not replace, your physical interactions with students. This balance ensures that the personal connection central to yoga remains a key part of your teaching. If in-person options aren’t available to you, think about hosting live zoom sessions or 1:1 meetups with your students and clients.

Digital Presence as an Extension of Yoga Practice

Embracing the digital world as a yoga teacher is not just about adapting to new technologies; it’s about extending the principles and essence of yoga into the digital realm. It involves finding balance, nurturing connections, and evolving in ways that enrich both your teaching and your students’ experiences.

Just as yoga teaches balance and awareness in physical practice, these principles should be applied to our digital engagement. Using technology mindfully ensures that it enhances, rather than detracts from, our lives and the lives of our students.

Some Ideas for a Thriving Digital Yoga Presence:

  • Regular Engagement: Consistently update your social media and blog, and actively engage with your audience.
  • Varied Content: Utilize different types of content, such as videos, stories, and live sessions, to maintain audience interest.
  • Authenticity: Your digital persona should reflect your real-life teaching style and philosophy.
  • Learning and Adaptability: Stay on top of the latest digital trends and platforms, ensuring they align with your yoga practice.
  • Balanced Technology Use: Maintain a healthy balance between your online activities and your offline life.
  • Innovative Online Classes: Offer unique and engaging online classes for various skill levels. There’s something for everyone!
  • Interactive Webinars: Conduct webinars on yoga, wellness, and Ayurveda, encouraging participation and learning.
  • Personalized Yoga Blogs: Share your personal yoga journey and insights through detailed blog posts.
  • Instructional Videos: Create clear, informative videos on yoga poses, sequences, and breathing techniques.
  • Collaborative Partnerships: Collaborate with other yoga teachers or wellness brands to expand your reach and offer diverse perspectives.

Expanding Digital Strategies for Yoga Teachers:

  • Digital Marketing: Learn and apply digital marketing strategies to promote your classes and content.
  • Email Marketing: Utilize email newsletters to keep your students informed and engaged.
  • Virtual Yoga Retreats: Host online yoga retreats, offering a unique and immersive experience.
  • Building an Online Community: Foster an interactive community where students can share experiences and support each other.
  • Developing a Personal Brand: Create a strong brand that reflects your unique approach to yoga and wellness.
  • Social Media Advertising: Explore targeted advertising to reach a broader audience.
  • Yoga Podcasting: Consider starting a yoga-themed podcast to share knowledge and connect with a new audience.
  • Online Yoga Challenges: Organize challenges to engage and motivate your community.
  • Digital Detox Retreats: Balance your digital presence by hosting retreats that emphasize offline time and mindfulness.

8 Things You Can Do Now to Bring Your Yoga Presence Online

1. Understand Social Media Strategies

Each social media platform offers unique opportunities to connect with different segments of your audience. For instance, Instagram is ideal for sharing visually appealing content like yoga poses and short instructional videos. Facebook can be leveraged for longer, more detailed posts and for fostering community discussions. YouTube is perfect for hosting longer instructional videos and guided yoga sessions. Understanding and leveraging the strengths of each platform can maximize your impact and reach.

2. Craft a Cohesive Online Brand

Your online presence should reflect a cohesive brand that aligns with your yoga philosophy. This includes consistent messaging, visual style, and tone across all digital channels. A cohesive brand helps build trust and recognition among your audience, making your digital presence more impactful and memorable.

3. Create Engaging Content: The Heart of Digital Connection

Developing a content strategy that effectively engages and informs your audience is crucial. Share personal yoga experiences, educational posts about different yoga styles, and practical tips for incorporating yoga into daily life. Interactive content like Q&A sessions and live streams can significantly boost engagement and foster a stronger connection with your audience.

4. Utilize Technology for Interactive Online Classes

The advent of technology has made it possible to teach yoga to students around the world through online classes. Platforms like Zoom, Skype, or dedicated yoga class platforms can be used to conduct live sessions, allowing for real-time interaction and personalized guidance. These platforms also facilitate hosting workshops, seminars, and even yoga teacher training courses, providing a comprehensive online yoga experience.

5. Build a Direct Connection Through Email Marketing

An email list is a valuable tool for any yoga teacher going digital. It allows for direct communication with your audience, sharing updates, class schedules, and exclusive content. Regular newsletters keep your students engaged and informed about your offerings, deepening their connection with your yoga practice.

Check out this video with Kate Lombardo on Yoga Email Marketing: 5 Simple steps to start & grow your email following as yoga teacher!

6. Start Blogging: Deepening the Digital Yoga Narrative

A blog is a powerful platform for sharing in-depth insights into yoga, wellness, and your personal journey. Topics can range from the benefits of different yoga styles and explorations of yoga philosophy to advice for beginner practitioners. A well-maintained blog not only attracts new followers but also establishes your authority in the yoga field, enhancing your credibility and reach.

7. Leverage Analytics and Feedback

Using analytics tools provides valuable insights into your audience’s preferences and behaviors, guiding your content strategy and helping you create more of what your audience loves. Regularly seeking feedback through surveys or comments also informs your digital strategy, ensuring it remains aligned with your audience’s needs and interests.

8. Maintain Balance Between Online and Offline Activities

While building a digital presence is important, maintaining a balance between online and offline activities is crucial for overall well-being. Regular digital detoxes, mindfulness practices, and personal yoga practice help maintain this balance, ensuring that your digital activities align with the holistic well-being that yoga promotes.

Continued Learning and Growth

The digital landscape is constantly evolving, and staying informed about the latest trends and tools is crucial for a successful online presence. Continuous learning, through online courses, webinars, or collaborating with digital marketing experts, keeps your digital strategy fresh and effective.

The journey of taking your yoga teaching digital is a continuous process of learning, adapting, and connecting. By embracing the digital world thoughtfully and mindfully, you can extend the reach and impact of your yoga practice, touching more lives and fostering a global community centered around wellness and mindfulness.

Child's Pose

Yoga for Injuries

By Yoga Asana

The topic of injuries is incredibly vast and an injury is often just as unique as the person who’s injured. Some injuries are minor and only cause a little discomfort, while others can completely rock your world and cause major complications. Injuries happen for different reasons and the way they manifest depends on the individual person. Whether you’re a teacher or practitioner of yoga – or both! – it’s helpful to understand why injuries happen and how you can use the yoga practice to feel better.

The way we deal with injuries and the ego

You may have heard yoga teachers talk about the concept of playing your edge or finding the place that’s right at the tip of your comfort zone. I don’t know about you, but that line is sometimes incredibly blurry for me. I’ve gone through phases where my ego got the best of me and I pushed too hard only to find myself limping out of class. The strain on unprepared tissues and overload underdeveloped muscles was something I wasn’t aware of early on in my practice. I wanted my poses to look like the person’s next to me, and that was something I needed to get over quickly.

Reminders to consider when practicing yoga while hurt

The wisdom of yoga teaches you the value of patience; it encourages you to pay attention to the preparatory poses and be with your breath and the sensations of your body as you move through a yoga class. Remember, it’s not a recital or a show. It’s a practice that’s just as much mental as it is physical. Yoga is a dialogue between body and soul. The journey is personal and you have unique boundaries that only you know how to work with. It’s important to remember that there isn’t a prize for going deeper in a pose or getting your body into some complex shape. The physical asana practice exists to help you feel at home in your body, not like you’re an enemy of it.

Everyone heals differently and at a different pace. Take your time easing back into your yoga practice and always consult with your healthcare provider before getting back into any physical practice. Make sure you know what your injuries are and do your research about that area of your body. Have conversations with your doctor and yoga teacher if you are confused about anything that’s currently going on. It sometimes helps to keep a list of questions and to also keep a log of how you’re feeling from day to day. This can help you to understand if your route to recovery is working out or if you need to make different adjustments.

Yoga Poses for an Injury

Modifications for: Adho Mukha Svanasana (Downward Facing Dog)

Downward Facing Dog

Downward Facing Dog with forearms down

Wrist injuries or general discomfort in the wrists are a common reason why people may choose to completely skip their yoga practice. So many of the physical asanas are practiced on the hands and putting weight on the hands can aggravate a wrist that’s already causing some trouble. The good news is that a lot of the asanas can be done on the forearms.

If you’re taking modifications because of a wrist injury, it’s important to remember to move slowly and mindfully. If you’re in a class that’s moving faster than you can move, it’s okay to slow down so you can come to your forearms and adjust the practice for your body. If taking a group yoga class is causing more stress than serenity, then opt into a home practice.
Props Needed: Block

How To:

  1. Begin seated and slowly start to bring your palms to the mat. Without putting pressure on your hands, slide onto your forearms and make an “L” shape with your pointer fingers and thumbs. Place your block between the “L” shapes while keeping your elbows on the mat at shoulder’s width distance.
  2. Send one leg out long behind you and then the other to come into a plank pose on your forearms with your elbows rooting down and encouraging some activation into the block with your hands.
  3. Send your hips up and back to a Downward Dog modification, keeping your forearms on the mat.
  4. If you need to, step your feet a little close to your forearms. Look between your knees or ankles to elongate your neck.
  5. As you breathe in, engage your thighs. As you breathe out, reach your heels down (it’s okay if they don’t touch the mat!)

*Reminders: You can omit the block and either keep your palms pressing into the mat or interlace your fingers together. Always come out of the asana as carefully as you entered into it.

Modifications for: Eka Pada Rajakapotasana, Forward Fold Variation (Pigeon Pose)

Pigeon Pose

Pigeon Pose lying on your back, interlacing fingers on the back of the lifted thigh

Hips and knees are two areas of the body that are often either overworked, underworked, or somehow just causing discomfort in some way. Everyone’s body is so beautifully unique, and so are the reasons for pain in these areas. It’s often said that yoga is about relationships and that includes your relationship with your body.

If you’re taking modifications in a yoga class because of a knee or hip injury, you can experiment with different prop set-ups and other ways to figure out how to distribute your body weight so it isn’t aggravating an injury. However, a really simple way to practice Pigeon Pose can be to just take it to your back so you’re not putting any weight on any area of your body that’s currently bothering you.
Props Needed: None

How to:

  1. Begin seated and slowly start to make your way onto your back. Be mindful of putting weight on any area that is currently needing your attention at the moment. Use the strength of your arms and abdominals to brace you as you make your way down.
  2. Step both of your feet to your mat and begin with them about hip’s width apart. Keep your knees bent, but you can step your feet as far forward as needed if bending your knees is currently causing you any discomfort or pain.
  3. Take your right ankle over your left thigh. Bring it just below your knee, closer to your quadricep.
  4. Check in with how your knees and/or hips are feeling right here. This may be enough for some. You may also experiment with flexing your right foot, moving your left foot closer to your hip, or gently encouraging your right hip a bit forward.
  5. If it feels okay for you, you also have the option to interlace your fingers around your left thigh, taking your left foot off the mat. Be sure to have your right arm between your things as opposed to having it wrapped around your right one.
  6. As you breathe in, relax your jaw. As you breathe out, be mindful of your current injury and imagine any stagnation drifting away.
  7. Repeat on the left side.

*Reminders: Everyone’s body is put together in a different way. One person’s thigh bone sits in their hip socket differently than another’s. Focus on what sensations come up for you and how you can work with your own inhale and exhale.

Modifications for: Balasana (Child’s Pose)

Child's Pose

Child’s Pose with bolster beneath the seat

Have you ever been in a yoga class and thought “How is this supposed to be a resting pose?” when the teacher instructs the class to come into Child’s Pose? For some people, this is always the case, but for others, it’s a realization that comes while working with an injury.

Child’s Pose can be difficult if you’re working with knee, hip, or neck injuries of any kind. The bending of the knees, flexibility of the hips, and general discomfort in the neck can make this pose anything but a resting pose. Remember, you can always take a comfortable seat of your choice instead of practicing this one! However, if you have access to some props, you can still receive the benefits it offers.
Props Needed: Bolster, Blanket, Block

How to:

  1. Begin seated and fold your blanket up so it can slide beneath your shins. Come onto the blanket with your shins on it and your knees a bit forward of it.
  2. Take your bolster and slide it between your calves and your hamstrings so it creates a cushion between this area and fills the gap that would normally be there.
  3. Find your block and place it towards the front of your mat where you anticipate your forehead to be.
  4. As carefully and mindfully as can be, release your seat towards your heels and your forehead to your block.
  5. You may bring more cushion beneath your seat or more padding beneath your head if needed. You can use unconventional props like towels and blankets if you don’t have the more traditional props.
  6. You can either extend your arms forward or reach them back towards your feet
  7. As you breathe in, imagine your whole back body filling with new space and breath. As you breathe out, relax your jaw and picture any tension releasing out with the exhale.

*Reminders: As much as this asana wants to be in the “resting poses” category, it doesn’t always have a seat at that table! It’s okay to remind yourself that you may need to adjust it to work for you.